Update auf Plone 4.2
Weil ich der Welt nicht allzu lange hinterher hinken wollte, habe ich diese Seite heute auf Plone 4.2 und gleichzeitig auf Python auf 2.7.3 gehoben.
Weil ich der Welt nicht allzu lange hinterher hinken wollte, habe ich diese Seite heute auf Plone 4.2 und gleichzeitig auf Python auf 2.7.3 gehoben.
Habe mich heute den ganzen Tag auf dem LinuxTag rumtreiben dürfen. Den Morgen habe ich damit verbracht ein bisschen über die Stände zu schlendern und mich mit dem einen oder anderen ein wenig zu unterhalten. Wie es sich für echte Nerds gehört, habe ich auch einige, zur Feier des Tages , behandtuchte gesichtet.
Den Nachmittag habe ich mir die Vorträge zum Monitoring angeschaut, auch um mal wieder auf den neusten Stand gebracht zu werden. Aber offensichtlich war ich von der Realität gar nicht so weit entfernt.
Angefangen mit dem Vortrag RRDtool Caching Daemon - Wie entgehe ich der I/O-Hölle von Sebastian "tokkee" Harl. Sebastian hat einen Einführung gegeben, wie RRDtool Daten speichert und warum die Art und Weise zu viel I/O-Last führen kann. Als Lösung zeigte er den RRDtool Caching Daemon und wie dieser das Problem verringert. Der Vortrag hat mir recht gut gefallen. Er war kurzweilig und nicht zu technisch.
Am meisten habe ich mich eigentlich auf Apache Tomcat Monitoring effektiv von Peter Roßbach und Tobias Benner gefreut. Wie sich herausstellen sollte, der schwächste Vortrag zum Monitoring. Zwar gingen die beiden ganz kurz auf Möglichkeiten ein, zusätzliche Monitoring-Möglichkeiten in Tomcat einzubauen. Dies aber nur sehr oberflächlich. In Wirklichkeit war der Vortrag eine Werbeveranstaltung für die selbst geklöppelte Monitoring Software der beiden, die ich hier namentlich auch gar nicht erwähnen möchte. Ich war wirklich einigermaßen enttäuscht.
Nach einer kurzen Kaffeepause ging es im Monitoring-Saal mit Icinga - Best Practices eines Forks von Bernd Erk weiter. Zwar hatte der Vortrag nicht damit zu tun, Icinga als Monitoring-Lösung einzusetzen, als viel mehr zu zeigen, dass es nötig und richtig sein kann, ein Fork eines Projekts zu erstellen. Bernd beschrieb auf frische und unterhaltsame Weise wie die Gruppe sich dazu entschlossen hat, und dass dem Fork ein langer Denkprozess vorangegangen ist. Außerdem zeigte er was nötig ist, um den Fork zu etablieren und zu einem lebendigen Projekt zu entwickeln. Schon alleine da angefangen, dass die Projektsprache von Anfang an englisch war, obwohl es nur deutschsprachige Mitstreiter gab.
Den Schluss machte Christoph Mitasch mit seinem Vortrag MySQL Monitoring & Management . Auch dieser hat mir wieder sehr gut gefallen. Zwar kannte ich die meisten sachen schon, konnte aber trotzdem ein paar Ideen mitnehmen. Z.B. hatte ich das percona-toolkit gar nicht auf dem Schirm.
Zwar hätte ich auch gerne noch was aus der Linux Kernel Ecke gehört, doch Monitoring erschien mir sinnvoller. War auf jeden Fall ein schöner Tag und der Besuch hat sich gelohnt.
… und dann das:
[512793.619518] sd 8:0:0:0: [sdc] Unhandled sense code

[512793.619530] sd 8:0:0:0: [sdc]  Result: hostbyte=DID_OK driverbyte=DRIVER_SENSE
[512793.619543] sd 8:0:0:0: [sdc]  Sense Key : Medium Error [current]
[512793.619557] sd 8:0:0:0: [sdc]  Add. Sense: Unrecovered read error
[512793.619573] sd 8:0:0:0: [sdc] CDB: Read(10): 28 00 00 00 29 08 00 00 08 00
[512793.619601] end_request: I/O error, dev sdc, sector 10504
[512793.626080] quiet_error: 20 callbacks suppressed
[512793.626090] Buffer I/O error on device sdc1, logical block 1057
[512796.823981] sd 8:0:0:0: [sdc] Unhandled sense code
[512796.823993] sd 8:0:0:0: [sdc]  Result: hostbyte=DID_OK driverbyte=DRIVER_SENSE
[512796.824025] sd 8:0:0:0: [sdc]  Sense Key : Medium Error [current]
[512796.824039] sd 8:0:0:0: [sdc]  Add. Sense: Unrecovered read error
[512796.824054] sd 8:0:0:0: [sdc] CDB: Read(10): 28 00 00 00 29 08 00 00 08 00
[512796.824083] end_request: I/O error, dev sdc, sector 10504
[512796.830613] Buffer I/O error on device sdc1, logical block 1057
unschön :(
Ja Kernel. Am besten mitten während des fsck entscheiden sdc wegzuschmeißen und es als sdb neu zu mappen. Daten scheinen aber zum Glück alle in lost+found gelandet zu sein.
By default, darktable supports input, output and display profiles and it provides builtin support for sRGB, Adobe RGB and linear RGB. For publishing the photos to the web, sRGB is the best choice. For printing photos, however, some printing studios (e.g. Saal Digital ) offer icc profiles for the paper they use. To get the best results, it is recommended to use these profiles.
Though it is not documented on the darktable homepage, it is possible to install icc profiles. You just have to create the folder color/outin the config directory of darktable and place the icc profile file there. On most systems the config directory is ~/.config/darktable.
$ mkdir -p ~/.config/darktable/color/out

$ cp ~/Downloads/SaalDigital_SoftProof_Fuji.icc ~/.config/darktable/color/out/
After restarting darktable SaalDigital_SoftProof_Fujiis selectable in the export module on the lighttableand the output color profile module in the darkroom.
Am 15. März 2012 hat das Team hinter dem Open Source Foto-Workflow und RAW-Entwickler darktable die Version 1.0 heraus gegeben und eben an diesem Tag aktualisierte Sergej das Paket für Arch Linux .
Nach einer kleinen Fototour in Berlin habe ich die neue Version heute installiert und ein wenig mit den neuen Bildern gespielt. Ich habe darktable mit meinem bestehenden Katalog gestartet - nach einem Backup natürlich - und bin dabei auf keinerlei Überraschungen gestoßen. Die bearbeiteten Bilder sehen aus wie vor dem Update auch. Von Lightroom 4 hat man an dieser Stelle ja schon Schlimmes gehört ;) Auch alle Presets und Tags, etc, die ich mit den alten Versionen erstellt habe sind noch vorhanden und funktionieren Tadellos.
Von der Mailing list und aus dem Release Announcement wusste ich schon, dass es ein neues image cache gibt. Daher war es kein Wunder, dass alle Thumbnails beim start verloren waren. Doch dann kam die große Überraschung… der neue cache ist um Längen schneller als in vorherigen Versionen.
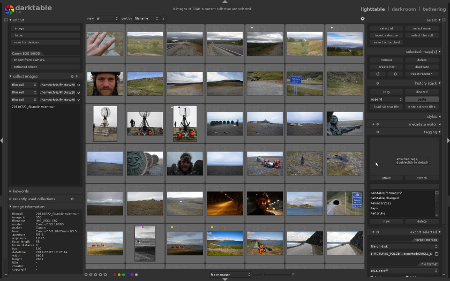
Auf den ersten Blick fällt die leicht geänderte GUI auf. An einigen Ecken wurde Hand angelegt und die Bedienelemente aufgehübscht. Besonders fallen die Elemente in der rechten oberen Ecke auf, über die zwischen lighttable, darkroom und tethering gewechselt werden kann.
lighttable Die Bedienung auf dem lighttable funktioniert immer noch wie bei den vorangegangenen Versionen und hier gibt es kaum Überraschungen. Einzig die Sterne und Farblabels befinden sich jetzt unter, statt über den Bildern.

Auf der linken Seite befinden sich die Module zum Importieren, Auswählen von Kollektionen und Informationen zum Bild, rechts Aktionen die man auf selektierte Bilder anwenden kann (z.B. Metadatan setzen, tagging, export, etc.). Die einzige mir aufgefallene Änderung ist das Keyword-Modul auf der linken Seite. Dies baut anhand der existierenden Tags eine Baumstruktur auf über die einfach Bilder selektiert werden können. Es ist nur darauf zu achten, die Tags korrekt zu setzen. Soll es eine Kategorie Deutschland, darunter Berlin und darunter Tempelhof geben, muss ein Tag DeutschlandTempelhof angelegt werden. In meinem Test musste darktable nach dem Hinzufügen der Tags neugestartet werden. Erst danach wurden die neue Baumstruktur erzeugt.
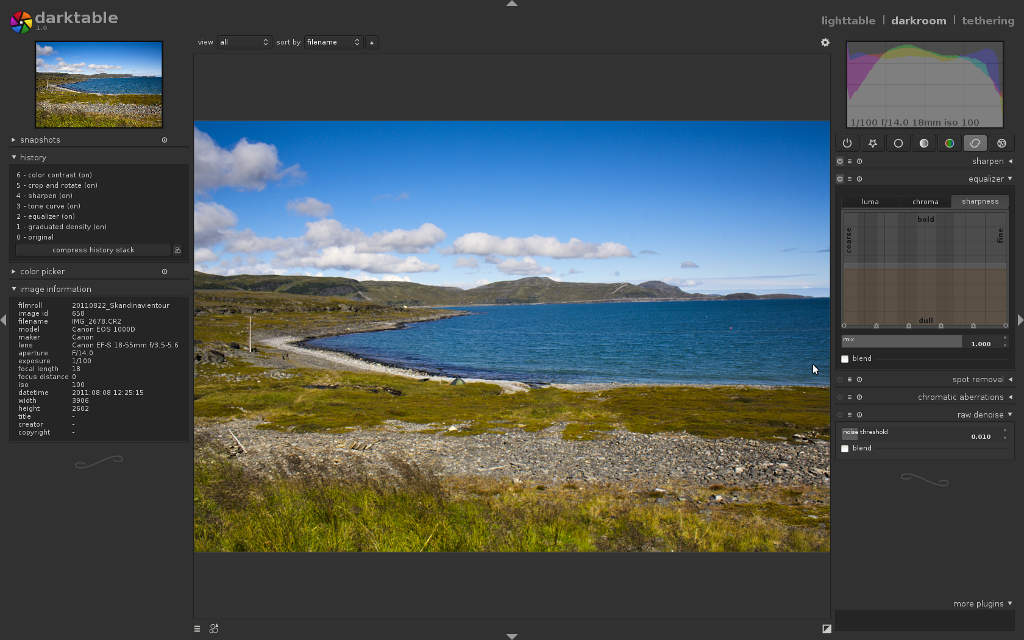
darkroom In den darkroom gewechselt, habe ich erst mal einen kleinen Schreck bekommen. In der Mitte gab es nur ein winziges Bildchen und nicht die gewohnte Größe. Die Werte für diesen Bereich konnte ich aber in den Einstellungen anpassen: Preferences -> gui options. Die beiden Punkte "maximum width of image drawing area" und "maximum height of image drawing area" habe ich auf 1680x1050 angepasst und bekomme nun wieder die gewohnte vorschau.

Die Bedienung im darkroom hat sich bei der Auswahl der Modul-Kategorien ein ganz kleines bisschen geändert. Die Anpassungen sind aber so gut gelungen, dass ich mich schon beim ersten Klick wie zu Hause gefühlt habe. "Meine" Module funktionieren noch wie vorher so dass ich mich gar nicht erst umgewöhnen muss. Das neue Modul "Shadows and Highlights" finde ich gut gelungen und werde es in Zukunft bestimmt einsetzen.

tethering Zum ersten mal gibt es in Version 1.0 tethering. Und da meine Kamera laut Release Notes unterstützt wird habe ich auch das ausprobiert. Nachdem die Kamera angesteckt wurde muss auf dem lighttable im Import-Modul ein "scan for devices" aufgerufen werden. Danach steht die Kamera für tethering zur Verfügung. Der Iso-Wert und der Weißabgleich können über das Modul "camera settings" eingestellt werden. Dies sind in der Standardeinstellung die einzigen beiden Eigenschaften. Ich habe die Blende und die Belichtungszeit mal hinzugefügt, konnte die Kameraeinstellung aber nicht ändern. Ebenfalls in diesem Modul kann festgelegt werden, dass eine einstellbare Anzahl von Bildern geschossen werden sollen. Zudem kann ein timer gesetzt werden. Diese Zeit wird zwischen den Aufnahmen gewartet, nicht aber vor der ersten! In meinem Test hat die Belichtungsreihe erst funktioniert, als ich die Kamera im manuellen Modus an den Rechner geschlossen habe. Auf Blendenvorwahl und anschließendem Wechsel auf manuell bekam ich nur eine Fehlermeldung. Im tethering Modus können Bilder gleich mit Tags versehen werden. Außerdem kann für die laufende tethering Session ein Jobcode definiert werden. Das Datum und der Jobcode bilden das Verzeichnis in dem die Bilder abgelegt werden. Eine Bildvorschau auf dem Rechner gibt es leider nicht.
Mein Fazit darktable ist erwachsen geworden. Die GUI macht einen runderen und schöneren Eindruck als bei den alten Versionen. Neuerungen wie das tethering funktionieren erstaunlich zuverlässig obwohl sie das erste Mal enthalten sind. Besonders hervorzuheben ist der wesentlich schnellere image cache, der mir doch einige Schmerzen erspart. Schön ist auch, dass ich einfach mit meiner alten Datenbank weiter arbeiten konnte und um ein Migration herum gekommen bin.
Obwohl ich mit den alten Versionen schon ziemlich zufrieden war ist die 1.0 noch mal ein großer Schritt in die richtige Richtung.
I don't know why, but today my icons in gnome3 were gone. I was able to click on the areas and get the spefic functionality. So the next step was a deeper look into .xsession-errors
I found some errors like this:
Gtk-WARNING: Theme parsing error: gtk-widgets-assets.css:280:73: Couldn't recognize the image file format for file '/usr/share/themes/Adwaita/gtk-3.0/assets/primary-toolbar-raised-button-border.svg'
The solution was very easy. Just to rebuild /usr/lib/gdk-pixbuf-2.0/2.10.0/loaders.cache:
# gdk-pixbuf-query-loaders > /usr/lib/gdk-pixbuf-2.0/2.10.0/loaders.cache
Found the solution here .
Wach, von ausgeschlafen will ich mal nicht sprechen, die Sonne lacht durch die Wolken über dem Berliner Himmel. Nach dem Frühstück packe ich Kameras, Filme und Belichtungsmesser ein, setze mich auf das Rad und fahre Richtung Tempelhofer Feld. In den letzten Wochen bin ich leider nicht so viel zum fotografieren gekommen wie ich gerne hätte, doch heute ist irgendwie der Wurm drin. Zwar hole ich die Kamera aus der Tasche und mache ein paar belanglose digitale Bilder, so richtig Fotostimmung will aber nicht aufkommen. Statt dessen setze ich mich lieber in ein Cafe.
Dieses Jahr hat mich eine Phase der absoluten Unkrativität erwischt und ich habe bisher noch kein Bild geschossen, bei dem sich eine Veröffentlichung lohnen würde. Um wieder ein bisschen in Schwung zu kommen, sollte ich mir vielleicht ein Projekt suchen und gezielt vor die Türe zu gehen. Doch die Ideen sitzen auch nicht so locker.
Häufig jammere ich ein bisschen darüber im Dunkeln und bei Kälte laufen zu gehen. Oft genug ist es auch wirklich erbärmlich und bringt nicht wirklich Spaß. Heute war es mal wieder anders. Zwar habe ich mich ziemlich schwer getan, den Hintern hoch zu kriegen, bin aber durch einen sternenklaren Himmel entschädigt worden. Im Osten stand der Vollmond, direkt darüber der Mars, im Süd-Westen der Jupiter über dem Saturn, dazwischen das Orion Sternbild. Schwer genug den Blick vom Himmel zu reißen. Nur gut, dass ich die Strecke kenne :)
"Wenn ihr im US-Wahlkampf mithelfen wollt, dann setzt einen Link auf Rick Santorum for president. Die waren mal der 1. Hit bei Rick Santorum, jetzt sind sie deutlich gefallen. Santorum selber hatte Google belästigt, sie sollen das mal aus dem Index schmeißen. Also, einmal an alle: einen Link auf spreadingsantorum.com bloggen oder tweeten, mit Rick Santorum als Text. Die Nachwelt wird euch dankbar sein."